|
|
(39 intermediate revisions by 2 users not shown)
|
| Line 17: |
Line 17: |
| == Confirm whether the alternator is faulty == | | == Confirm whether the alternator is faulty == |
|
| |
|
| As removal of the alternator is time consuming, please confirm whether the alternator is faulty before removing it. This can be done by, eg: | | As removal of the alternator is time consuming, please confirm whether the alternator is faulty before removing it. This can be done by checking battery, fuses, terminals, drive belt, wiring, voltage and current (under different engine RPM and electrical loads). |
|
| |
|
| * measuring the battery voltage (which would be around 12v with a charged battery, but dropping slowly as it is not being charged and the full load of the vehicle electrical is borne by the battery
| | == Precautions == |
|
| |
|
| * removing the positive cable from the battery while running. If the alternator is generating power, the vehicle will keep running and the voltage generated would be in the order of 14v. With a faulty generator, the voltage and/or current would be less, and often zero. In that case, the engine would stop when the battery is disconnected. | | Alternators (and batteries) are fragile and can be easily damaged by inappropriate treatment, including: |
| | |
| | * infrequent use of battery |
| | * disconnecting battery while engine running |
| | * running engine without battery connected |
| | * insufficiently charged battery |
| | * loose or corroded battery terminals |
| | |
| | Check warranty conditions for alternators and batteries if in doubt. Refer eg: http://alternatorparts.com/warranty-return_policy.htm |
|
| |
|
| == Alternator removal == | | == Alternator removal == |
| To remove the alternator: | | To remove the alternator: |
| * Safety first: Disconnect the battery to ensure the vehicle is not inadvertently started | | * Safety first: Disconnect the battery to ensure the vehicle is not inadvertently started |
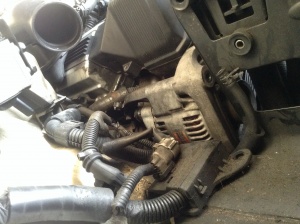
| * Find the alternator! | | * Find the alternator! (Follow the drive belt) |
| [[File:Under bonnet.jpg|thumb|Somewhere under this, there's an alternator...]] | | [[File:Under bonnet.jpg|thumb|Somewhere under this, there's an alternator...]] |
| * Remove the cover from the Cruise Control actuator | | [[File:Belt paths.jpg|thumb|Drive belt paths. AL = Alternator, TP = Tensioner Pulley]] |
| | * Remove the cover from the Cruise Control actuator (the cover is held in place by three clips and should pull straight up) so that you can see what you’re doing and have more space to work |
| [[file:Cruise control cover.jpg|thumb|Cruise control cover]] | | [[file:Cruise control cover.jpg|thumb|Cruise control cover]] |
| [[file:Air box removed.jpg|thumb|Air box removed]] | | [[file:Air box removed.jpg|thumb|Air box removed]] |
| * [[Remove the Air a Cleaner Assembly]] (including the Intake Air Flow Meter and Air Cleaner Hose ("concertina pipe") by loosening one hose tie and removing 3 x bolt) | | * [[Remove the Air Cleaner Assembly]] (including the Intake Air Flow Meter and Air Cleaner Hose ("concertina pipe") by loosening one hose tie, removing 4 x bolts. 3 bolts in the front, and one in the rear, ). Loosening the hose clamp closest to the engine, then wiggling that end of hose loose works for me, after which the whole assembly can be slid backwards and lifted out. |
| * Remove the vacuum hose that is in the way from the Intake Air Connector Pipe | | * Remove the vacuum hose that is in the way from the Intake Air Connector Pipe |
| * Remove the second vacuum hose | | * Remove the second vacuum hose |
| [[file:Power steering reservoir bolts removed.jpg|thumb|Power steering reservoir bolts removed]] | | [[file:Power steering reservoir bolts removed.jpg|thumb|Upright|Power steering reservoir bolts removed]] |
| * Remove the 3 x bolts holding the side of the power steering reservoir (taking care not to lose the bushes that are now loose in the bolt-holes) | | * Remove the 3 x bolts holding the side of the power steering reservoir (taking care not to lose the bushes that are now loose in the bolt-holes), which is necessary in order to wiggle the reservoir - and in particular the hose underneath it - towards the passenger side so that there is space for the long alternator mounting bolt to be removed. |
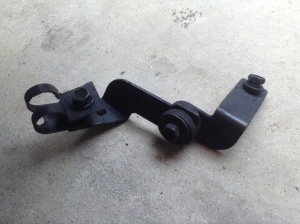
| [[file:Two other brackets.jpg|thumb|Two other brackets to be removed]] | | [[file:Two other brackets.jpg|thumb|Two other brackets to be removed]] |
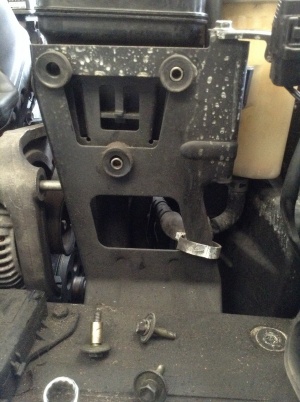
| * Remove the bracket holding the hydraulic line | | * Remove the bracket holding the hydraulic line. It may be enough to loosen it so that it can be rotated away. |
| [[file:Alternator removal hydraulic pipe bracket.jpg|thumb|Alternator removal hydraulic pipe bracket]] | | [[file:Alternator removal hydraulic pipe bracket.jpg|thumb|Alternator removal hydraulic pipe bracket]] |
| * Remove the bracket holding the electrical connector from under the air box | | * Remove the bracket holding the electrical connector from under the air box |
| Line 45: |
Line 54: |
| * Remove the serpentine belt (by pressing down on the serpentine belt tensioner pulley) | | * Remove the serpentine belt (by pressing down on the serpentine belt tensioner pulley) |
| [[file:Serpentine belt tensioner pulley.jpg|thumb|Serpentine belt tensioner pulley]] | | [[file:Serpentine belt tensioner pulley.jpg|thumb|Serpentine belt tensioner pulley]] |
| * Remove the front left mounting bolt from the alternator | | * Remove the front left (ie passenger side) mounting bolt from the alternator. You’ll need a 14mm socket or extension that is long enough to reach the recessed bolt, but not so long that you hit the fan etc |
| [[file:Alternator front left bolt.jpg|thumb|Alternator front left bolt]] | | [[file:Alternator front left bolt.jpg|thumb|Alternator front left bolt]]. |
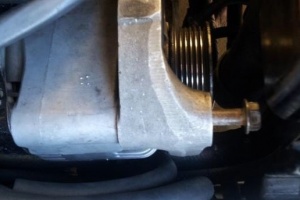
| * Remove the rear alternator mounting bracket by removing the 14mm bolt from underneath the bracket. This can be hard to see, let alone reach with a tool that provides enough leverage as sockets do not easily fit and there is limited space even for a spanner. A 14mm ring spanner with an (improvised) extension (made by hooking on another spanner to the first one) can work. | | * Remove the rear alternator mounting bracket by removing the 14mm bolt from underneath the bracket. This can be hard to see, let alone reach with a tool that provides enough leverage as sockets do not easily fit and there is limited space even for a spanner. A 14mm ring spanner with an (improvised) extension (made by hooking on another spanner to the first one) can work. Ideally, a 14mm flexible head ratchet with a relatively short handle will fit and make it easy. |
| [[file:Alternator rear bracket.jpg|thumb|Alternator rear bracket]] | | [[file:Alternator rear bracket.jpg|thumb|Alternator rear bracket]] |
| [[file:Alternator rear bracket removal tool.jpg|thumb|Alternator rear bracket removal tool(s)|]] | | [[file:Alternator rear bracket removal tool.jpg|thumb|Alternator rear bracket removal tool(s)|]] |
| [[file:Alternator rear support bracket removed.jpg|thumb|Alternator rear support bracket removed]] | | [[file:Alternator rear support bracket removed.jpg|thumb|Alternator rear support bracket removed]] |
| * Remove the earth connection nut and cable | | * Remove the electrical connection nut and cable |
| [[file:Alternator earth cable removed.jpg|thumb|Alternator earth cable removed]] | | [[file:Alternator earth cable removed.jpg|thumb|Alternator earth cable removed]] |
| * Remove the electrical cable connector cover, then un clip and remove the cable | | * Remove the electrical cable connector cover, then un clip and remove the cable |
| [[file:Alternator connector.jpg|thumb|Alternator connector]] | | [[file:Alternator connector.jpg|thumb|Alternator connector]] |
| * Remove the alternator by turning his way and lifting it out | | * Remove the alternator by turning this way and lifting it out |
| [[file:Alternator removal angle.jpg|thumb|Alternator removal angle]] | | [[file:Alternator removal angle.jpg|thumb|Alternator removal angle]] |
| | |
| | The 3 x alternator mounting bolts are 14mm, the electrical connector is 12mm and most (all?) minor items to be removed use 10mm. |
|
| |
|
| == UZZ32 Alternators are unique == | | == UZZ32 Alternators are unique == |
| The UZZ32 Alternators differ from other V8 Soarers, as well as between year models! | | The UZZ32 Alternators differ from those on other Soarer models and are rated at 120A (whereas other Soarers are rated at ? 100A). |
| Alternators from eg UZZ30. UZZ31 or SC400 are not suitable, and replacement parts can be difficult to find. | | Alternators from eg UZZ30, UZZ31 or SC400 are not suitable, and replacement parts can be difficult to find. However, some of the parts are interchangeable. |
|
| |
|
| == Alternator parts == | | == Alternator parts, part numbers and availability == |
|
| |
|
| The diode rectifier is not available anymore (for the UZZ32). However a 90-92 alternator for a MR2 happens to have near identical parts from its Nippon Denso alternator. Whilst the alternator itself isn't a fit, the diode rectifier, the brushes and the regulator are. I canibalised a MR2 alternator and rebuilt my one.
| | There are thee items that primarily wear out on alternators: |
|
| |
|
| Source: http://www.jkwebdesign.net/lsocbb/viewtopic.php?t=9824&highlight=&sid=8b2b6c4b1d783e020bd4c73eca24a93f
| | * brushes |
| | * regulator |
| | * rectifier |
| | |
| | [[file:19-03 Alternator.jpg|thumb]] |
|
| |
|
| The right parts for the 32 alternator are as follow:
| | == Part numbers, availability and substitutable parts == |
|
| |
|
| Brush holder 39-8203 | | {| border="1" class="wikitable sortable" |
| Regulator 15-8351 (same as for the 31). | | |+ Toyota UZZ32 alternator parts |
| Rectifier Transpo CN-INR736-0073 (this is 32 specific with right angle rear external connection, not straight out as with the 31, which has the big wire on the side). | | ! Item |
| | ! Photo |
| | ! Toyota Part Number |
| | ! Availability |
| | ! Alternatives |
| | ! Approximate cost |
| | ! Source |
| | |- |
| | ! Brush / Brush holder |
| | | [[file:3982033 Brush Holder Assembly.jpg|thumb]] || 27370-75060 || || 398203, 3982033 || || || || |
| | |- |
| | ! Regulator |
| | | [[file:IN438 Regulator.jpg|thumb]] || 27700-46040 || || IN438, 15-8351, WIL P7182 || || || |
| | |- |
| | ! Diode Rectifier |
| | | [[file:INR736 Bridge Rectifier.jpg|thumb]] || 27357-50070 || Discontinued || Transpo CN-INR736-0073, 31127PY3013 || || |
| | |- |
| | |} |
|
| |
|
| Source: http://www.soarerworld.com/forum/showthread.php?30553-32-Alternator-Swap
| | The regulator is same as for UZZ31, but the diode rectifier is not available anymore (for the UZZ32). However a 90-92 alternator for a MR2 happens to have near identical parts from its Nippon Denso alternator. Whilst the alternator itself isn't a fit, the diode rectifier, the brushes and the regulator are. I canibalised a MR2 alternator and rebuilt my one. |
|
| |
|
| | Source: http://www.jkwebdesign.net/lsocbb/viewtopic.php?t=9824&highlight=&sid=8b2b6c4b1d783e020bd4c73eca24a93f |
| | |
| | Rectifier is 32 specific with right angle rear external connection, not straight out as with the 31, which has the big terminal bolt on the side). |
| | |
| | Source: http://www.soarerworld.com/forum/showthread.php?30553-32- |
|
| |
|
| Toyota part numbers:
| |
| Regulator assembly: 27700-46040
| |
| Rectifier: 27357-50070
| |
| http://www.lexuspartsnow.com/parts/lexus-regulator-assy-generator~27700-46040.html | | http://www.lexuspartsnow.com/parts/lexus-regulator-assy-generator~27700-46040.html |
| http://www.partswebsite.com/autopartspeople/oemparts/toyota-155/2735750070.html | | http://www.partswebsite.com/autopartspeople/oemparts/toyota-155/2735750070.html |
| Line 85: |
Line 119: |
| Search on web for compatible parts, eg. | | Search on web for compatible parts, eg. |
| * http://www.alternatorstarter.kr/product/view.php?mn=23&ct=alternator_component&sct=REGULATORS&stx=&idx=432&page=12 | | * http://www.alternatorstarter.kr/product/view.php?mn=23&ct=alternator_component&sct=REGULATORS&stx=&idx=432&page=12 |
| | * http://m.riautoelectric.com/REGULATORS.html |
| | * http://store.alternatorparts.com/part-3982033-brush-holder-assembly-for-denso-type-alternators.aspx |
| | * http://www.autopartoo.com/oem/partscrossinterchange.html?search=vr883 |
| | * http://www.langemachinery.com/Auto%20Articleshow.asp?ArticleID=22435&xx=QDQX |
| | * http://www.gleamautoproducts.com.au/Nippondenso_Rectifiers.html, RN-10 has 4x70A codes which may be a good upgrade from the usual 4x50A |
| | * https://www.partswebsite.com/autopartspeople/index.php?i=3&type=parts&start=1 |
|
| |
|
| * http://m.riautoelectric.com/REGULATORS.html
| |
| price $24 | | price $24 |
| IN438 Regulator | | IN438 Regulator |
| Line 92: |
Line 131: |
| • Denso IR/IF Alternators | | • Denso IR/IF Alternators |
| • Replaces - DENSO 126000-1110, 126000-1260, 126000-1270, TOYOTA 27700-46030, 27700-46040 | | • Replaces - DENSO 126000-1110, 126000-1260, 126000-1270, TOYOTA 27700-46030, 27700-46040 |
| | |
| | Additional reference and details: |
| | |
| | * http://soarercentral.com/sc-forum/messages/282/384434.html?1414384585 |
|
| |
|
| http://store.alternatorparts.com/in438hd---heavy-duty-voltage-regulator.aspx | | http://store.alternatorparts.com/in438hd---heavy-duty-voltage-regulator.aspx |
| Line 99: |
Line 142: |
|
| |
|
| Also: replace the (two?) bearings while the alternator is out | | Also: replace the (two?) bearings while the alternator is out |
| | |
| | http://www.lextreme.com/alternator.html |
Alternator removal and servicing
Alternator failure message
When the ignition is on, but the engines not yet started, the display will display (in English) "CHARGE" - this is normal.
However, when the alternator is not charging, a message will be displayed in Japanese, which, when translated, means "Alternator not charging".
On some cars, this message may indicate a proble with, eg, the battery being due for replacement, and/or the battery connections being loose. On a Soarer, this message generally means what it says; there's insufficient charge coming from the alternator.
Other symptoms
Whilst the vehicle will run for some time without a working alternator, the battery will quickly be drained of power. When this occurs, various electrical functions will gradually stop working. This includes, eg, the active suspension. It has also been reported that the engine failure / cat warning light will come on
Confirm whether the alternator is faulty
As removal of the alternator is time consuming, please confirm whether the alternator is faulty before removing it. This can be done by checking battery, fuses, terminals, drive belt, wiring, voltage and current (under different engine RPM and electrical loads).
Precautions
Alternators (and batteries) are fragile and can be easily damaged by inappropriate treatment, including:
- infrequent use of battery
- disconnecting battery while engine running
- running engine without battery connected
- insufficiently charged battery
- loose or corroded battery terminals
Check warranty conditions for alternators and batteries if in doubt. Refer eg: http://alternatorparts.com/warranty-return_policy.htm
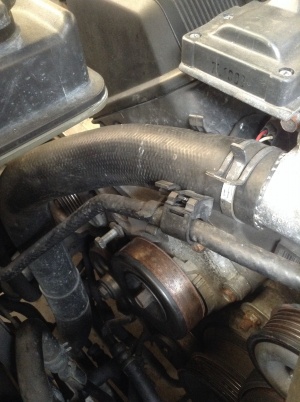
Alternator removal
To remove the alternator:
- Safety first: Disconnect the battery to ensure the vehicle is not inadvertently started
- Find the alternator! (Follow the drive belt)

Somewhere under this, there's an alternator...

Drive belt paths. AL = Alternator, TP = Tensioner Pulley
- Remove the cover from the Cruise Control actuator (the cover is held in place by three clips and should pull straight up) so that you can see what you’re doing and have more space to work
- Remove the Air Cleaner Assembly (including the Intake Air Flow Meter and Air Cleaner Hose ("concertina pipe") by loosening one hose tie, removing 4 x bolts. 3 bolts in the front, and one in the rear, ). Loosening the hose clamp closest to the engine, then wiggling that end of hose loose works for me, after which the whole assembly can be slid backwards and lifted out.
- Remove the vacuum hose that is in the way from the Intake Air Connector Pipe
- Remove the second vacuum hose
Power steering reservoir bolts removed
- Remove the 3 x bolts holding the side of the power steering reservoir (taking care not to lose the bushes that are now loose in the bolt-holes), which is necessary in order to wiggle the reservoir - and in particular the hose underneath it - towards the passenger side so that there is space for the long alternator mounting bolt to be removed.

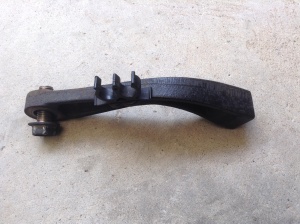
Two other brackets to be removed
- Remove the bracket holding the hydraulic line. It may be enough to loosen it so that it can be rotated away.
Alternator removal hydraulic pipe bracket
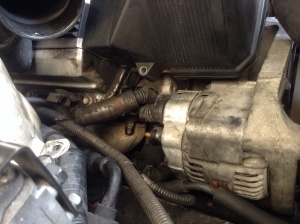
- Remove the bracket holding the electrical connector from under the air box
Unbolted cable bracket under air box
- Remove the front right mounting bolt from the alternator
Alternator front right bolt
- Remove the serpentine belt (by pressing down on the serpentine belt tensioner pulley)

Serpentine belt tensioner pulley
- Remove the front left (ie passenger side) mounting bolt from the alternator. You’ll need a 14mm socket or extension that is long enough to reach the recessed bolt, but not so long that you hit the fan etc
Alternator front left bolt
.
- Remove the rear alternator mounting bracket by removing the 14mm bolt from underneath the bracket. This can be hard to see, let alone reach with a tool that provides enough leverage as sockets do not easily fit and there is limited space even for a spanner. A 14mm ring spanner with an (improvised) extension (made by hooking on another spanner to the first one) can work. Ideally, a 14mm flexible head ratchet with a relatively short handle will fit and make it easy.
Alternator rear support bracket removed
- Remove the electrical connection nut and cable
Alternator earth cable removed
- Remove the electrical cable connector cover, then un clip and remove the cable
- Remove the alternator by turning this way and lifting it out
The 3 x alternator mounting bolts are 14mm, the electrical connector is 12mm and most (all?) minor items to be removed use 10mm.
UZZ32 Alternators are unique
The UZZ32 Alternators differ from those on other Soarer models and are rated at 120A (whereas other Soarers are rated at ? 100A).
Alternators from eg UZZ30, UZZ31 or SC400 are not suitable, and replacement parts can be difficult to find. However, some of the parts are interchangeable.
Alternator parts, part numbers and availability
There are thee items that primarily wear out on alternators:
- brushes
- regulator
- rectifier
Part numbers, availability and substitutable parts
Toyota UZZ32 alternator parts
| Item
|
Photo
|
Toyota Part Number
|
Availability
|
Alternatives
|
Approximate cost
|
Source
|
| Brush / Brush holder
|
|
27370-75060 |
|
398203, 3982033 |
|
|
|
|
| Regulator
|
Error creating thumbnail: Unable to save thumbnail to destination |
27700-46040 |
|
IN438, 15-8351, WIL P7182 |
|
|
|
| Diode Rectifier
|
Error creating thumbnail: Unable to save thumbnail to destination |
27357-50070 |
Discontinued |
Transpo CN-INR736-0073, 31127PY3013 |
|
|
The regulator is same as for UZZ31, but the diode rectifier is not available anymore (for the UZZ32). However a 90-92 alternator for a MR2 happens to have near identical parts from its Nippon Denso alternator. Whilst the alternator itself isn't a fit, the diode rectifier, the brushes and the regulator are. I canibalised a MR2 alternator and rebuilt my one.
Source: http://www.jkwebdesign.net/lsocbb/viewtopic.php?t=9824&highlight=&sid=8b2b6c4b1d783e020bd4c73eca24a93f
Rectifier is 32 specific with right angle rear external connection, not straight out as with the 31, which has the big terminal bolt on the side).
Source: http://www.soarerworld.com/forum/showthread.php?30553-32-
http://www.lexuspartsnow.com/parts/lexus-regulator-assy-generator~27700-46040.html
http://www.partswebsite.com/autopartspeople/oemparts/toyota-155/2735750070.html
Search on web for compatible parts, eg.
price $24
IN438 Regulator
• 12 Volt, A-Circuit, S-IG-L Terminals, 14.5 Vset, 5 sec. LRC
• Denso IR/IF Alternators
• Replaces - DENSO 126000-1110, 126000-1260, 126000-1270, TOYOTA 27700-46030, 27700-46040
Additional reference and details:
http://store.alternatorparts.com/in438hd---heavy-duty-voltage-regulator.aspx
http://store.alternatorparts.com/INR736-Bridge-Rectifier-For-Nippondenso-110A-Alternators-w/-130mm-OD-Stat.aspx
Also: replace the (two?) bearings while the alternator is out
http://www.lextreme.com/alternator.html


